Description:
The purpose of this exercise is to write & deploy a script to your eWON Flexy that will allow you to configure an Anybus Wireless Bolt via AT commands over a Telnet connection. While this program is directly geared towards configuring a Bolt, the principles learned throughout this program (tag access, opening connections, etc) can be used in a wide plethora of applications.Objective:
Create a parameterized & extensible script used to configure an Anybus Wireless Bolt via AT commands.Pre-Configuration
Using the script import option in the BASIC IDE, import the following starter code. lab_two_starter.bas (8.0 KB)After importing the wizard, explore your unit for a second.
First you will find 2 MEM Tags called ReadBoltConfiguration and WriteBoltConfiguration in your device. These tags will be our triggers to complete actions in the eWON. The third mem tag, ConnectedToBolt is solely used to determine when a valid connection has been established.
Next, due to the large scope of this program, regardless of complexity track, you will find a class called: HelperFunctions. This class has been pre-written with various helper functions that will be used throughout your application. Feel free to review them prior to beginning.
Additionally, if you look at the init section you will see a series of variables at the top of the file that will be used throughout the application. These final variables are our AT command placeholders.

Instructions
-
We first need to configure and setup our init section. Within our init section we will be creating two ONCHANGE listeners used to detect changes in our tag values ReadBoltConfiguration & WriteBoltconfiguration.
- When ReadBoltConfiguration is changed (Hint: see ONCHANGE) , move into the ReadTrigger label by using the GOTO command.
- Now that we have our change listener configured, we need to complete the ReadTrigger section. Inside of this section we need to read our Bolt configuration by calling the @ReadBoltConfiguration function.
Write a very simple IF clause so if the value of ReadBoltConfiguration equals 1, then reset that tag back to 0 and call the @readBoltconfiguration function. No else clause is needed here.
Read Config Spoiler (hover below)

- Now that we have our change listener configured, we need to complete the ReadTrigger section. Inside of this section we need to read our Bolt configuration by calling the @ReadBoltConfiguration function.
- When WriteBoltConfiguration is changed, move into the WriteTrigger label by using the GOTO command.
- Here we will complete an identical action to the ReadTrigger function except we will instead be calligng the function @writeNewBoltConfiguration
Write Config Spoiler (hover below)

- When ReadBoltConfiguration is changed (Hint: see ONCHANGE) , move into the ReadTrigger label by using the GOTO command.
-
We now need to complete our function that will allow us to write new data to our Bolt.
Take a moment to look through the script base provided, you will find a function called writeNewBoltConfiguration. This function does not take any arguments and does not return any values.
For our application we will be writing the following items to our Bolt:
- New SSID
- SSID Password
- SSID Channel
- SSID Security Type (WPA2)
We will now use our functions to send the data to the Bolt. Additionally, because we will need to concatenate the strings with an existing string, we will simply use our helper function buildWriteString to help us with this.
- By using one of our helper functions, we can actually simply call our @sendRequest function while passing the folowing items as arguments.
NOTE: The function values see can be copy & pasted
- For the SSID Use the format: Group#Bolt (replace # with your group number)
Use the function call: @sendRequest$(@buildWriteString$(SET_AP_SSID$, "Group#Bolt")) - For the Password use the password: flexthink
Use the function call: @sendRequest$(@buildWriteString$(SET_AP_PASSWORD$, "flexthink" + ",1")) - For the Channel use the value 11
Use the function call: @sendRequest$(@buildWriteString$(SET_AP_CHANNEL$, "11")) - For the Security method use 1 (WPA-2)
Use the function call: @sendRequest$(@buildWriteString$(SET_AP_AUTH_MODE$, "1"))
- For the SSID Use the format: Group#Bolt (replace # with your group number)
Write Function Config Spoiler (hover below)

- At this point we should have a fully functional script ready to go! Lets test things now.
- Start your program by clicking the start toggle button
- Navigate to the ViewIO screen and toggle the WriteBoltConfiguration tag.
Wait about 10-15 seconds.
- Now trigger the ReadBoltConfiguration tag.
If everything worked properly we should get no errors.
- Navigate to: Diagnostic -> Logs -> Event Logs and set the level to Trace. If all worked properly we should see something similar to:
BONUS!
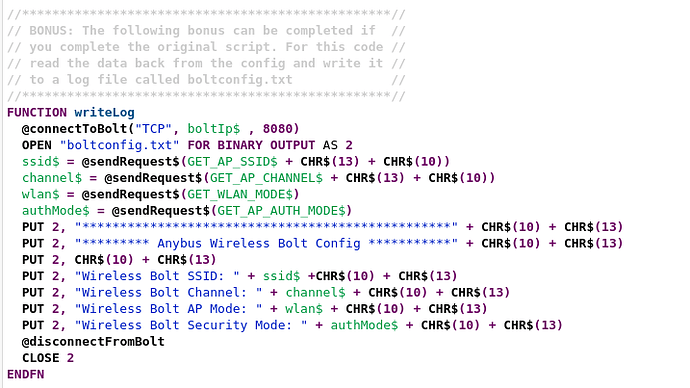
For the bonus, use the tag in the eWON called: WriteLog to first read the Bolt configuration and then write the corresponding values to a log file.Completed Program
Here you will find a completed copy of the program.bas file. Feel free to download and use as you need. The file labeled without bonus is just the raw program file. The one labeled with Bonus contains the bonus program of writing to a log as well.
Without Bonus: DOWNLOAD (8.6 KB)
With Bonus: DOWNLOAD (9.5 KB)


