NOTE, An updated version exists at the bottom of this page
How to setup an eFive
Created By: Tim Beaulieu
Version 1.1
Created on: 1/18/2019
Last Updated: 1/21/2019
eFive Step 1, Initial Connection:
- Power on the eFive and connect port 1 to a switch.
- The eFive should by default be 10.0.0.153 with username: admin and the password: admin
- Make sure that your PC has an ethernet cable connected to the switch and set the IP address of your PC to be in the range of 10.0.0.xxx

Figure 1: LAN network example on PC
note: If you find that your device has an unknown IP address or User/Password you can reset the device to factory settings by following the steps in appendix one of the following document: https://websupport.ewon.biz/sites/default/files/ig-012-0-en_efive_25.pdf
eFive, Step 2 System Settings:
- Open the eFive webpage on your browser by entering the 10.0.0.153 address into the URL
- Go to System > Date/Time and set your date and time zone. From here you can also choose if you want to enable an NTP server for your eWON devices to use. You can also choose if you only want to use the eFive local clock.

Figure 2 : Time settings/NTP server
eFive, Step 3 Network Settings:
- Connect a cable with access to an Internet router to a second switch. Then take another cable from that switch and connect it to port 2 of the eFive.
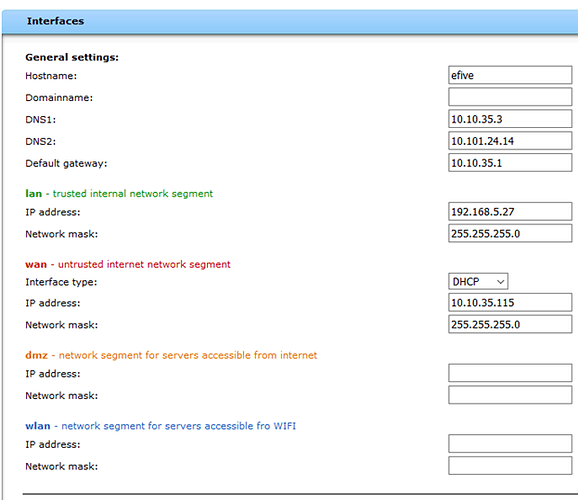
- Go to Network > Interfaces and start by setting the LAN address that you would like to use for the eFive
- If you know all your WAN information, you can set the Interface type to Static and enter your IP address and Network mask. You will also need to enter your DNS1, DNS2, and Default gateway. Make sure that you set up a Port Forwarding rule where you enter the WAN IP. This can also be done by using DHCP if the network supports it.
Figure 3: Network Interface example
eFive Step 4, VPN:
Go to VPN > Basic Settings and here you’ll create the Dynamic IP pool range. This will give you a range for eWON devices connecting. For example. If you want to connect 6 devices you could set the range from 192.168.5.20 to 192.168.5.25

Figure 4 : VPN Pool Example
- Make sure that you hit Save and then Restart OpenVPN Server .
- Next go to VPN > Accounts and go to Add user/device account. Make sure to give unique User/Device names.

Figure 5: For this device, we’re just going to call it Cosy and give it the password cosy. We’re also setting the network that will be accessible through the eWON device through here. So, with a 192.168.0.0/24 we will be able to access anything in the 192.168.0.xxx range. Make sure to set each eWON you connect for a different IP range ie: 192.168.1.0, 172.168.2.0, etc.
Go to VPN > CA and click download certificate for the CA Certification. Open this file in Notepad and set it aside for now.
Flexy Step 1, Initial Setup:
- Go to your Flexy’s homepage and go to Wizards in the top right corner. From there go through the System, Internet, wizards.
- When you go through the Internet Wizard, make sure that your WAN Ip address is in the same range as the eFive’s

Figure 6: WAN IP example
- Once you’re connected to through the Internet Wizard, go onto the VPN Wizard.
- Click on Configure eFive Connectivity

Figure 7: For this, you’ll grab the WAN IP Address of the eFive. The Username and Password will be the ones that you set in the step 4 accounts. The CA Certificate just needs to be copied and pasted from the notepad opened earlier.
eFive Step 5, rebooting:
- Go to VPN > Basic Settings
- Hit Restart OpenVPN Server, you should now see the device show its connection as up in on the home screen.

Figure 8: showing the device online
Flexy Step 2, NAT setting:
- Go onto the Flexy into Setup > System > Communication > Networking > Routing > and set the NAT and TF to NAT on LAN (Plug’n Route)
- Reboot the device

Figure 9: NAT setting
Disconnect from your Wifi and make the IP changes seen in the figure below. You should now be able to ping your Flexy’s LAN address as well as anything in the Flexy’s Subnet Range.
Note: The max number of routes that an eWON can process is 26 with a “network behind client” set and the option “Don’t push” is unchecked. You’ll need to set the option “Don’t push” for each eWON if you want to avoid this issue.


Figure 10: Set your LAN network to be in the IP range of your eFive and then set the LAN of the eFive as the Default Gateway.

